Traditional Japanese Sword Making Technique Explained
Traditional Japanese swordmaking techniques from the past are preserved in modern times. However, a finished sword is not the work of the swordsmith alone, but of several independent and highly specialized artisans. Gaining a good understanding of how a Japanese sword is actually made allows us to fully appreciate these works of art.
Let’s explore Japanese swordmaking: the smelting of the steel, forging of the blade, and finishing the sword. Note that Japanese sword replicas created today skip the traditional processes and utilize less expensive materials in order to lower production costs.
Manufacturing Traditionally Smelted Steel
Traditional Japanese swords (nihonto) are unique due to the steel from which they are crafted. This steel, known as tamahagane, is produced in a Japanese-style smelter or furnace called a tatara, utilizing satetsu—an iron ore found in sand form. A tamahagane is a type of high-carbon steel and plays a vital role in the quality and properties of Japanese swords.
Today, the tamahagane is almost exclusively produced in a tatara operated by the NBTHK in Yokota, in western Honshu, Japan. Master swordsmiths, including Yoshindo Yoshihara, prefer working with tamahagane due to its ease of forging and being the best steel for swords.
Still, some swordsmiths employ alternative methods for steel production. For instance, the oroshigane is produced by re-smelting various bits of iron, steel, or cast iron in the smith’s own forge. Also, swords can be made from electrolytic iron (denkai-tetsu) or sponge iron (kangan-tetsu). Smelting steel in a forge allows a swordsmith to experiment with the steel or produce a custom steel for a sword.
The Swordmaking Process
Modern Japanese swordsmiths use traditional methods from the past to forge the sword and create its distinctive hardened edge and aesthetic features.
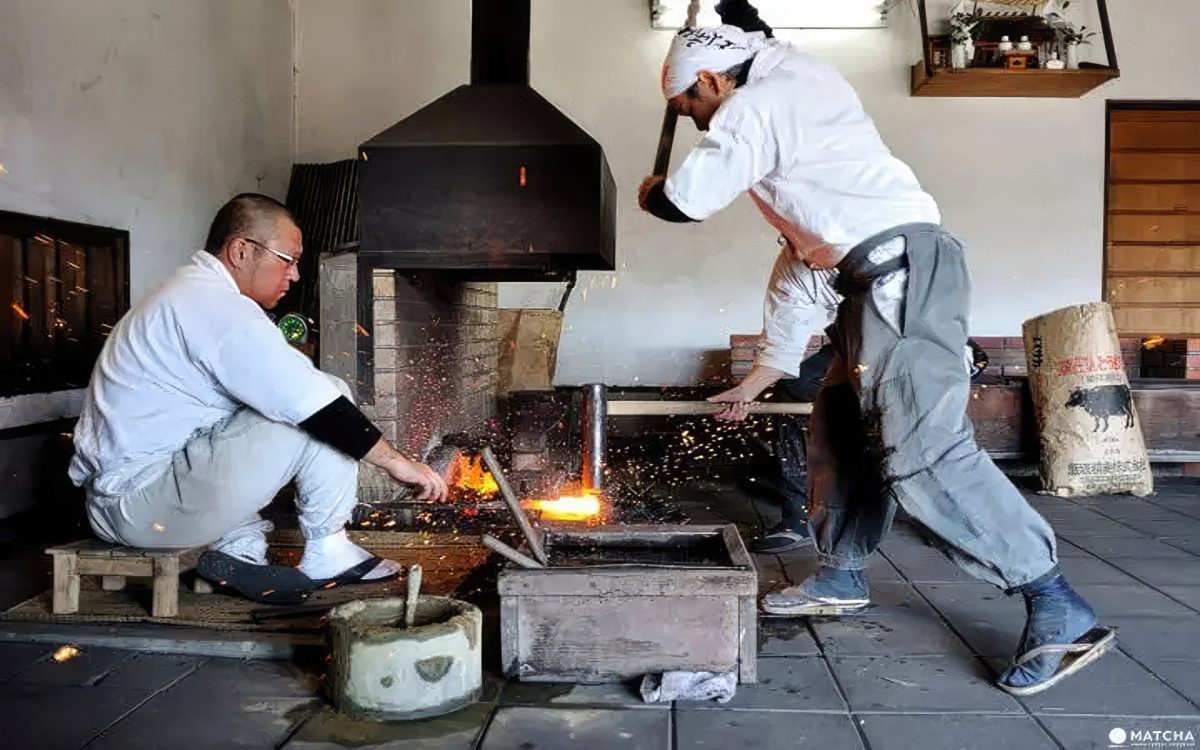
1. Tanren: Refining the Steel by Forge-Folding
Tanren refers to a process of refining the raw tamahagane by forging and folding, similar to kneading dough. It is one of the most critical aspects of the swordsmith’s work. Upon receiving the tamahagane from the tatara, the swordsmith reduces its carbon content and removes impurities to make it suitable for swordmaking.
The forging process also results in the jihada, a visible pattern on the steel surface. The swordsmith can intentionally manipulate the type of grain pattern (referred to as jihada or hada) to achieve the desired effect. At the end of the entire forging process, a low-carbon steel core (shingane) and the high-carbon steel jacket (kawagane) on the outer surface of the blade are formed.
2. Tsukurikomi and Sunobe: Forming the Steel Stock and the Blank
As previously mentioned, a Japanese blade often consists of two types of steel: jacket steel (kawagane) and core steel (shingane). Some types of blade constructions even contain more types of steel, each with varying hardness. Generally, the core steel is softer and functions as a shock absorber, while the jacket steel forms the harder surface of the blade.
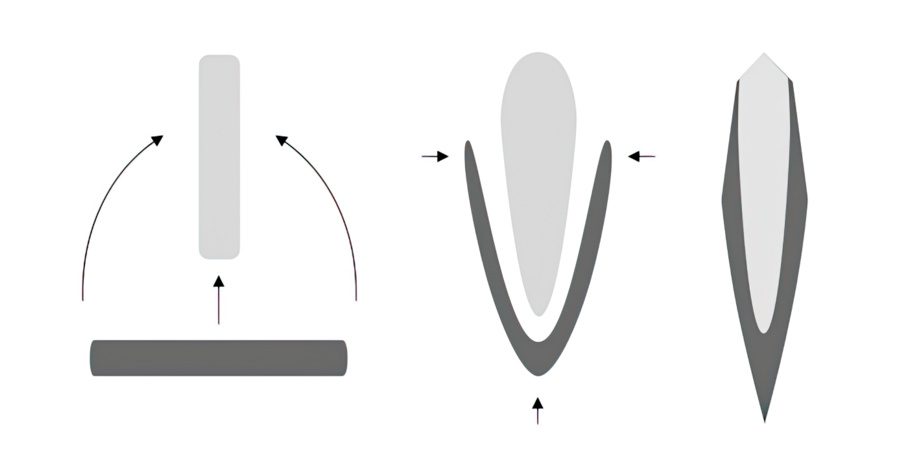
During the tsukurikomi process, the swordsmith forges the kawagane and the shingane together into a single bar of steel, usually by hammering the jacket steel into a U-shape, which will contain the core steel inside. In the sunobe process, the two pieces are completely welded together to form a sword blank (sunobe), which is tapered and rectangular.
Generally, sword blades, such as the katana sword and wakizashi, have a composite structure, but tanto daggers and small Japanese knives are often made from a single type of steel. It is important to note that early samurai swords, such as those from the Kamakura period, usually utilized a single type of steel.
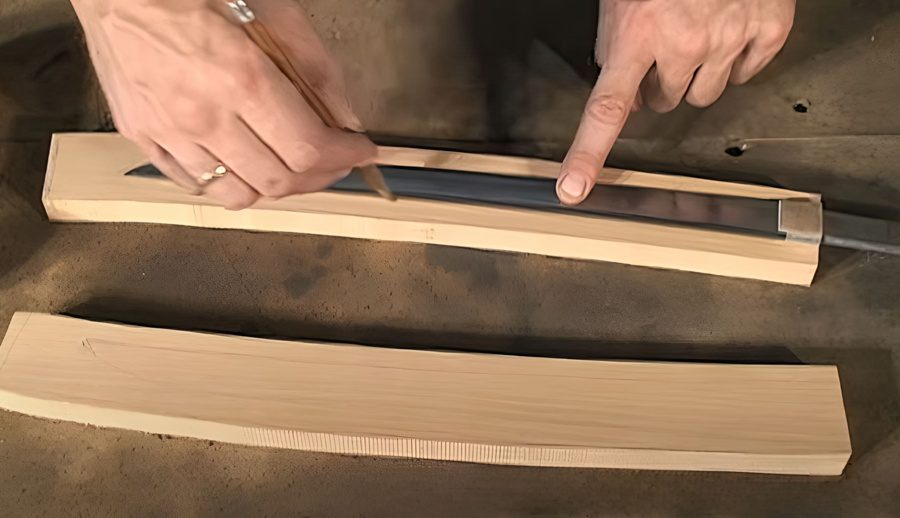
3. Hizukuri: Shaping the Blade
Hizukuri refers to the process of hammering the sword blank into the final shape of the blade. During this stage, the swordsmith defines the parts of the blade including the point, cutting edge, tang, and back surfaces. However, the cutting edge, which will be razor-sharp, is intentionally left relatively thick to avoid the risk of cracking during the final hardening and tempering process.
4. Shiage: Rough Grinding and Filing
During the shiage process, the blade’s shape and geometry are further refined using waterstones, drawknives (sen), and files. A swordsmith shaves off unevenness in the blade’s surface, and the blade shape becomes well-defined.
5. Tsuchioki: Applying Clay to the Blade
The next step is to create the hamon, a defined pattern of hardened steel along the cutting edge. It involves the tsuchioki process or covering the blade in clay before the heat treatment and quenching. Generally, the clay is applied very thinly along the cutting edge and thickly along the upper portions and back to allow differential hardening.
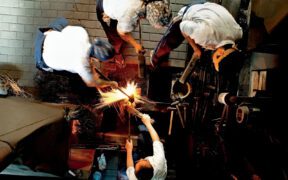
6. Yaki-ire: Hardening the Edge
Once the clay applied to the blade has dried, the blade is ready for the yaki-ire—the process of heating a sword and then plunging it into water. Generally, the steel hardens by heating and rapid cooling. The difference in hardness between the body of the blade and the cutting edge creates the hardening mark (hamon).
7. Sorinaoshi: Adjusting the Curvature
Sori refers to the measure of the curvature of the blade. After yaki-ire, some adjustments in curvature are usually needed. If there is too much curvature, a swordsmith can straighten the blade by hammering along the back ridge. On the other hand, if the curvature is uneven or insufficient, the swordsmith adjusts it by heating the back of the blade with a red-hot copper block and then rapidly cooling it in water.
8. Kajitogi: Rough Polishing
In the kajitogi process, a swordsmith gives the finished blade a rough polishing, using a grinding wheel and a series of polishing stones to clean and shape the blade. Generally, polishing is the work of the sword polisher. However, it is common for swordsmiths to give their own blades a rough polishing initially before handing them to an expert polisher to be finished.
9. Hi and Horimono: Grooves and Engravings
After the rough polishing, hi (grooves) or horimono (decorative carvings) are cut into the blade’s surface before sending the blade to the sword polisher. Grooves are practical and functional, lightening the blade while maintaining its structural integrity.
On the other hand, the horimono was originally designed to serve as religious talismans. Most swordsmiths create their own grooves, but more elaborate horimono is usually done by artisans who specialize in the craft.
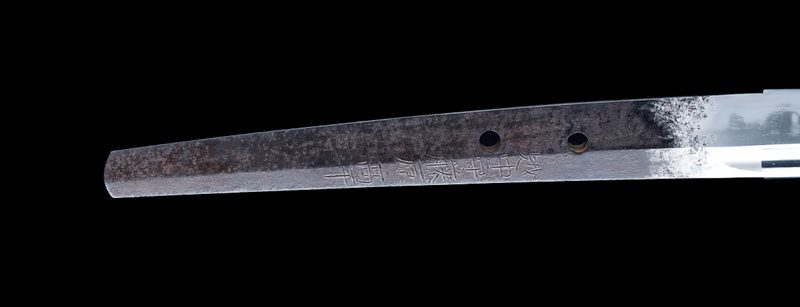
10. Filing and Finishing the Tang
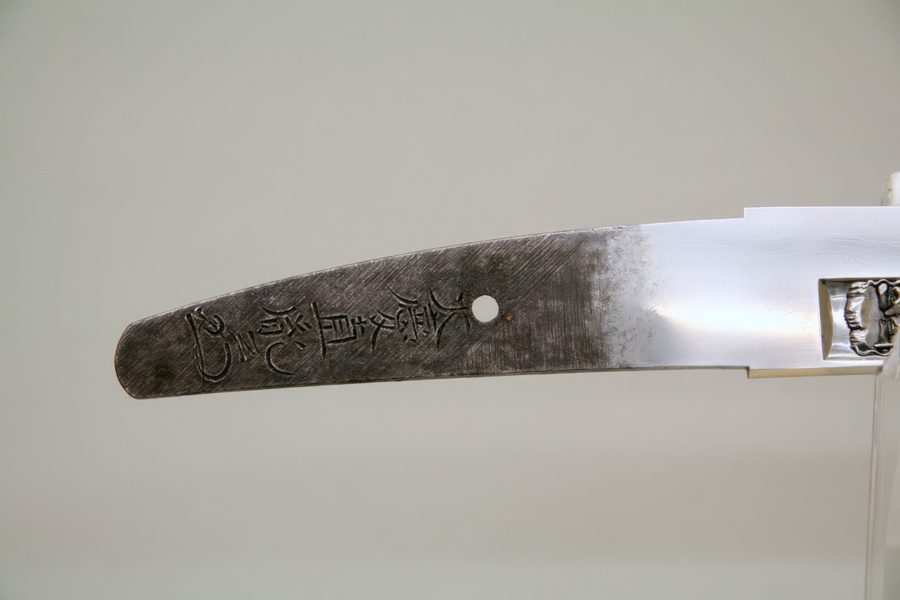
A swordsmith uses drawknives (sen) to clean and shape the tang (nakago) surfaces. Then the tang is finished with file marks (yasurime) which serves as a decorative finish, and several different patterns are used on the Japanese sword tangs. After the file work is done, a swordsmith drills a hole in the tang to hold the mekugi (bamboo rivet), securing the tang to the hilt.
Finishing the Sword
Once the swordsmith completes the blade, several tasks remain before the sword is finished. It must be polished to bring out all the details of the steel surface, and then equipped with a habaki (blade collar) to be placed in a saya (scabbard). Then a scabbard must be made to protect the sword. Each step is completed by an independent craftsman specializing in the craft.
1. The Polishing Process
Polishing a new blade will bring out all the artistic features of the steel surface, including the jigane, jihada, and hamon. It involves two stages: foundation polishing (shitage-togi) and finish polishing (shiage-togi).
Generally, a sword polisher uses several traditional polishing stones, from the roughest to the finest stones. In the foundation polishing, the expert refines the blade’s shape and makes a sharp cutting edge. In the finish polishing, the appearance of the steel surface is enhanced to reveal all the artistic details.
After refining the shape of the blade, the sword polisher sends it to the habaki maker. However, there are always some risks that blades will be scratched when making a habaki and scabbard. So, both habaki and scabbard are made before the finish polishing.
2. Making of a Habaki
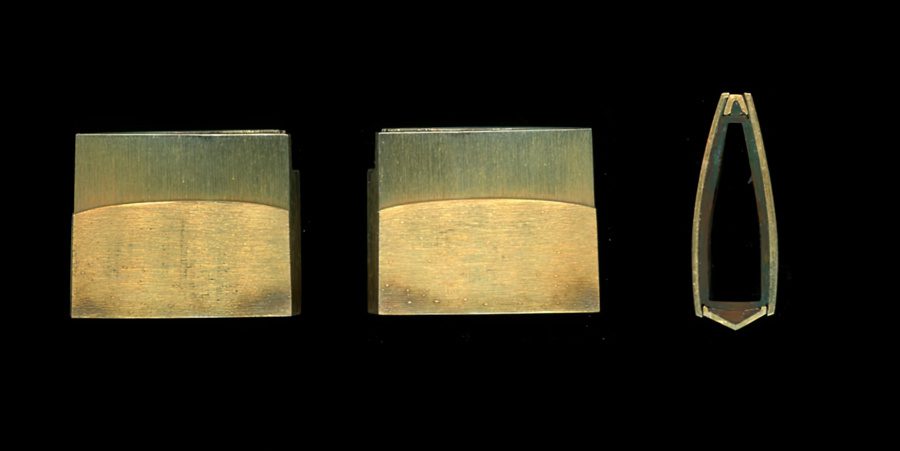
A habaki is a blade collar that supports the hilt and prevents the polished surfaces of the blade and sharp edge from coming into contact with the scabbard when sheathed. It is placed at the upper part of the tang, at the base of the polished surface. It can be a functional and decorative blade component, with some having unique forms and elaborate designs.
A habaki must conform closely to the shape of the tang to support the hilt and hold the blade securely in the scabbard. Some Japanese swordsmiths who forge and polish their blades into their final shape also make the habaki, though the blade must still go to the sword polisher to receive a final polishing (shiage-togi).
3. Making of a Scabbard
Once the habaki has been made, the blade is handed over to an expert who will carve a custom-made scabbard to fit the sword. A simple unfinished wooden scabbard (saya) is called shirasaya, which is required for storage and protection. Regular polish is essential for older blades to maintain their condition, and those undergoing re-polishing will also need a new shirasaya.
If the owner wants to use the blade as a sword or wants it to be in functional mounting, one must commission a group of other artisansto create a koshirae mounting after the smith finishes his work. A koshirae is a fully-functional mounting consisting of a lacquered scabbard, wrapped and braided handle (tsuka), sword guard (tsuba), fuchi and kashira (metal collar and pommel cap), menuki (grip ornaments), and so on.
Sometimes, a koshirae consists of tiny auxiliary blades and implements, such as the kozuka and kogai. A scabbard maker subcontracts the making of a koshirae to other artisans who specialize in the craft. Occasionally, a scabbard maker supervises the making of sword fittings. Some habaki makers also make sword fittings for a koshirae.
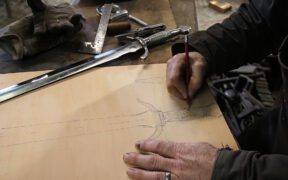
4. Inscribing the Signature on the Tang
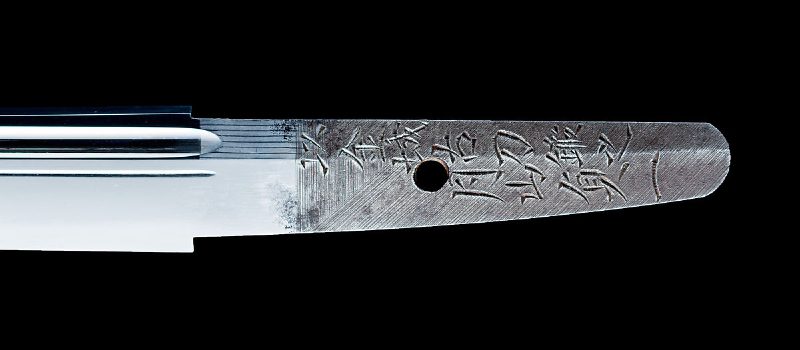
After receiving the blades back from these artisans and completing all the tasks on the sword, the swordsmiths will sign their name to the blade tang. However, a blade will only be signed when it passes the smith’s standards. A mei (signature) typically includes a swordsmith’s name, title, and province.
Still, the owner of the blade may request to include their own name and other information about their family. The mei is inscribed on the tang using a chisel and a hammer. It can be very characteristic of a swordsmith since one can utilize a thin or thick chisel and a light or heavy hammer.
Making of Sword Mounting and Fittings
If the new owner wants to use the blade as a sword or wants it to be in functional mounting, one must commission a group of other artisans to create a koshirae mounting after the smith finishes their work. What sets koshirae apart from sword mountings in other cultures is that it is so easily interchangeable, and it was common for a Japanese blade to have several sets of koshirae.
A koshirae is a fully-functional mounting consisting of a lacquered scabbard, wrapped and braided handle (tsuka), sword guard (tsuba), fuchi and kashira (metal collar and pommel cap), menuki (grip ornaments), and so on. Sometimes, a koshirae consists of tiny auxiliary blades and implements, such as the kozuka and kogai.
Generally, a scabbard maker subcontracts the making of a koshirae to other experts who specialize in the craft. Occasionally, a scabbard maker supervises the making of sword fittings. Some habaki makers also make sword fittings for a koshirae. Japanese sword mountings and related fittings are greatly prized for their artistic and decorative qualities.
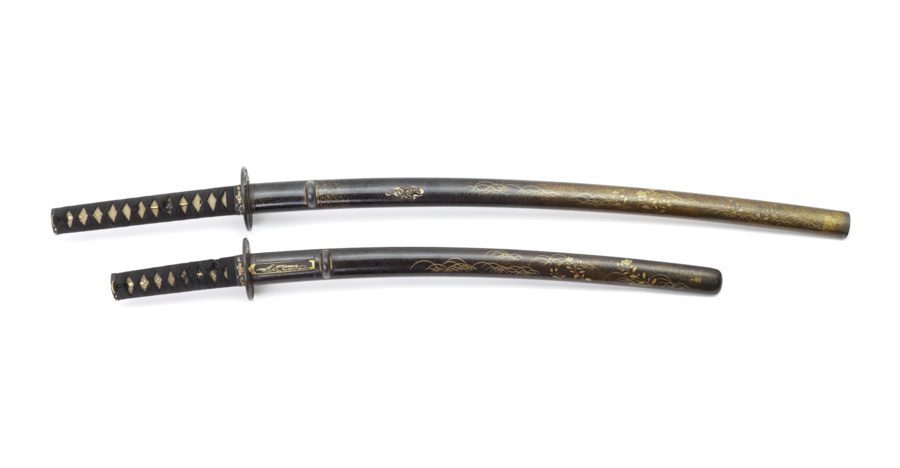
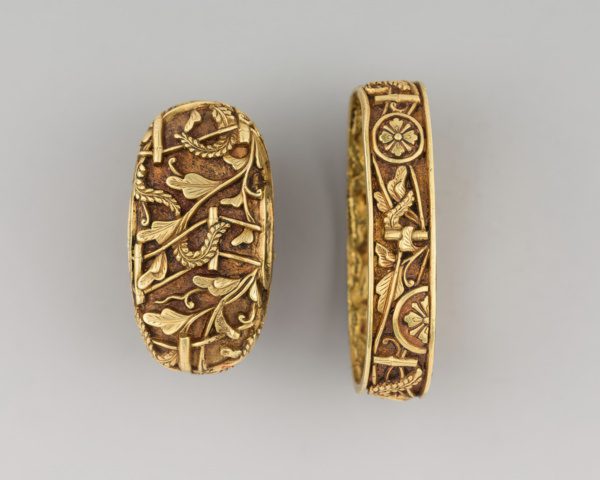
Hilt (Tsuka)

The hilt of a Japanese sword is made of wood, usually magnolia. It fits onto the blade’s tang so the sword can be held by hand. With few exceptions, the hilt is covered with ray skin or sharkskin and wrapped with thin twisted cords laid side-by-side to look like a braid.
These cords are made of fine materials, usually silk. The decorative wrapping method varies, including jabara-ito maki-zuka (snake belly hilt wrap style). Menuki ornaments are also on each side of the hilt, usually carved from shakudo (copper-gold alloy) and sometimes set with glass or stone.
Sword Guard (Tsuba)
The craftsmanship of Japanese sword guards is highly regarded, often featuring intricate designs that reflect Japanese mythology, religion, customs, and artistic concepts. Shakudo (a copper and gold alloy) and shibuichi (an alloy of silver and copper) are commonly used.
Tsuba artisans use several traditional metalworking techniques to craft these sword guards, including carving, inlaying, punchwork, chiselwork, filing, and openwork. Many of these techniques are also used on other metal fittings.
Typically, the metals are heated in a crucible until they melt and then poured into warm water. As the metal alloy cools, it forms a round ingot hammered into a flat disc shape. In creating the desired shape of the sword guard, a template is used to mark its outline, which is then carefully cut out using a fretsaw.
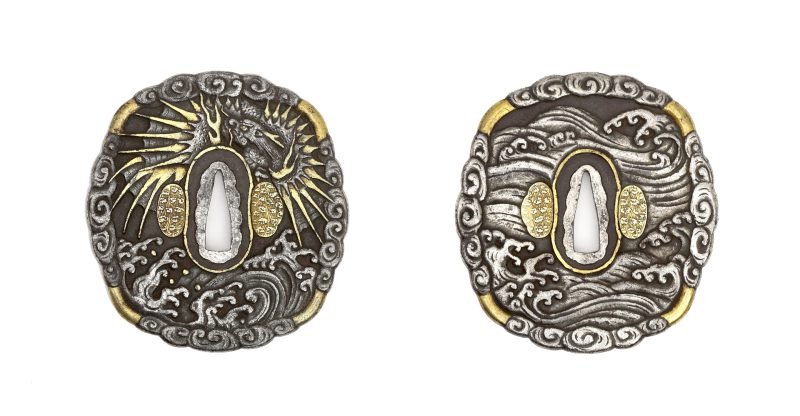
When decorating the sword guard, a thick tar holds it, and the texture is added by hammering. The popular nanako (fish eggs) or fine dotting effect is achieved by hammering the surface with a finely pointed punch with a cup-shaped tip. A copper-gold alloy shakudo tsuba is often artificially patinated by dipping it in a copper salt solution, turning it black.
Scabbard (Saya)
In a koshirae mounting, scabbards are decorated with lacquer, including maki-e, in which metal dust (usually silver or gold) is sprinkled into a lacquered surface before it sets and then polished or enhanced with various techniques. Some artisans also use mother of pearl for a sparkling appearance.
A scabbard also has a mouthpiece (koiguchi) on top of the scabbard, a chape (kojiri) at the end of the scabbard, and a cord knob (kurigata) on the side of the scabbard to hold the sageo cord and secure it to the obi belt. These scabbard fittings are often made of horn or metal.
Other Sword Fittings
The fine craftsmanship continues on other sword fittings, including the fuchi and kashira (metal collar and pommel cap). Some koshirae also consist of a kozuka (handle of the kogatana utility knife) and kogai (an implement used for the hair) fitted into the sides of the scabbard. The kogai and kozuka are often made in a matching set of fittings.
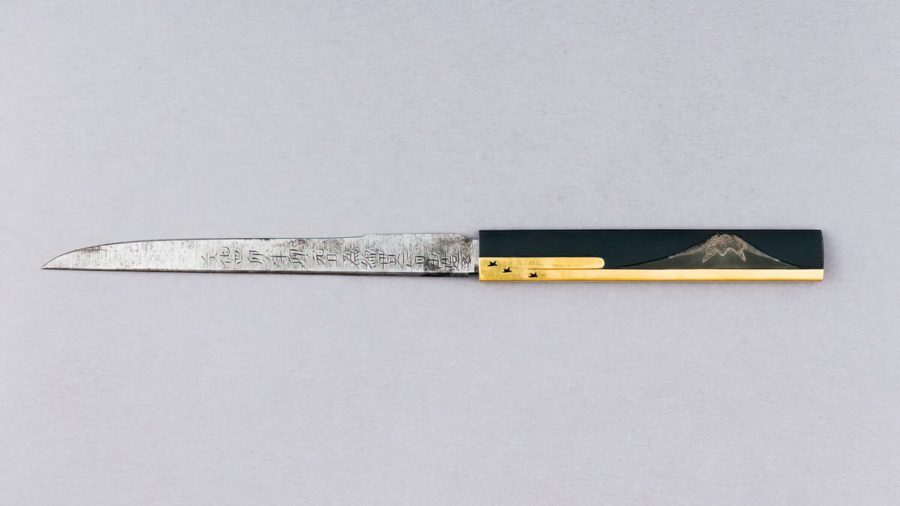
Like the sword guard, typical materials for these fittings include shakudo, shibuichi, gold, silver, copper, brass, and iron. The surface is worked on using various techniques, including hammering, carving with a fine chisel, polishing in a mirror-like smoothness, piercing, and openwork.
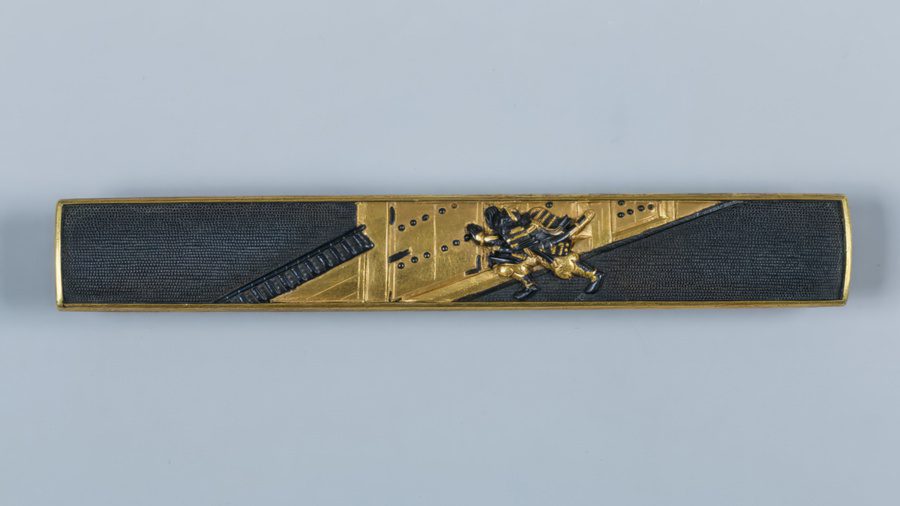
There are several traditional types of engraving (hori or bori). In taka-bori, the design is sculpted in high relief, while sukidashi-bori involves cutting away the background to achieve a low relief (ukibori). Katakiri-bori involves using the chisel’s edge to engrave lines of varying thicknesses and depths, resembling the appearance of brush strokes.
Additional decorative effects may be done with inlay (zogan) and iro-e, a term comprising various decoration techniques using applied colored metals and patinated alloys. Generally, inlay involves embedding softer metals like gold and silver into a harder base material made of copper, brass, iron, shakudo, or shibuichi.
Conclusion
Creating a Japanese sword is a long, complex process. After the swordsmith makes the blade, it goes to a polisher for the final shaping and polish. Then, it goes to an expert who makes the habaki. Finally, the blade is handed to a scabbard maker for a shirasaya or traditional koshirae, consisting of all the necessary components for a fully functional sword mounting.